Written Guides
Hardware Setup
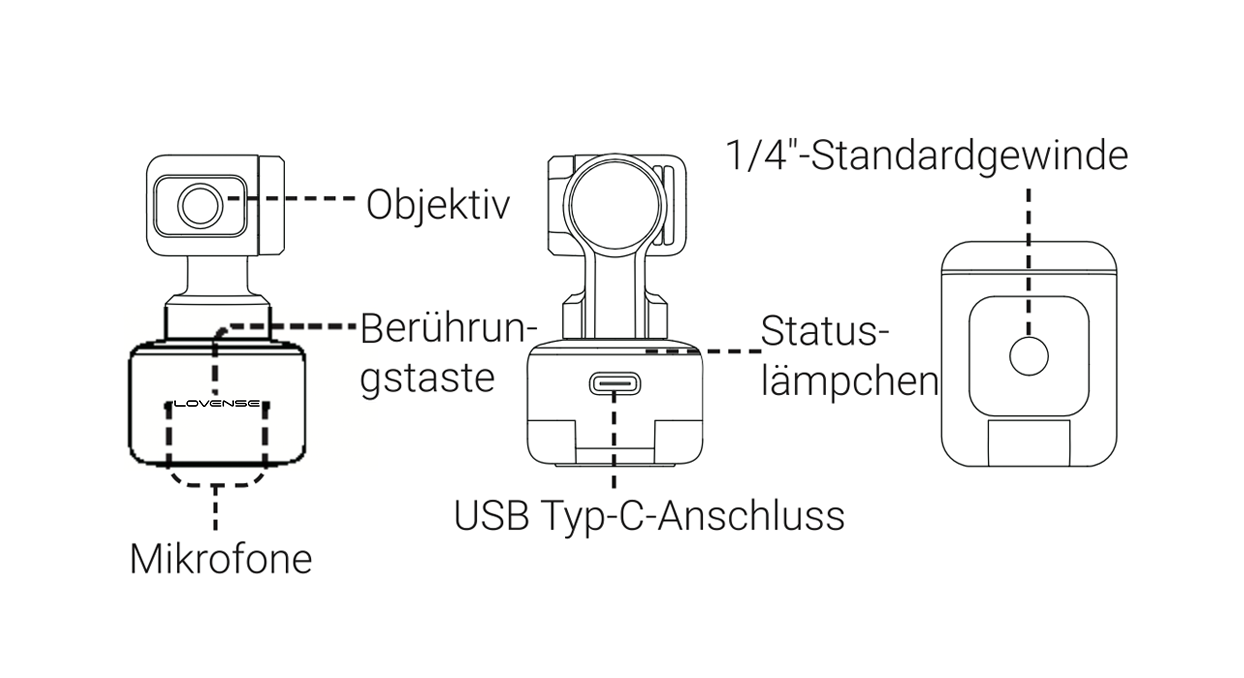
Names of parts
Setting up Lovense Webcam
Placement
Lovense Webcam can be set up in a number of ways. Its built-in clip design allows it to be clipped directly onto a computer screen (as shown below) or placed on a flat surface. The base has a 1/4" screw hole for use with a stand/tripod.
Connecting to Lovense Webcam
Important:
1) To avoid issues due to insufficient power supply, please connect Lovense Webcam directly to a computer or USB hub with an independent power supply.
2) To avoid compatibility issues, please use the included USB cable to connect Lovense Webcam to your computer.
Lovense Webcam is compatible with both Windows and macOS. Please use the USB cable to connect it to your computer's USB port. Once connected, the blue light on the camera will flash. When it is fully powered, the blue light will be continuously illuminated. It will automatically power off when unplugged.
Software Setup
You can easily set up a Lovense Webcam with or without Lovense software.
Without Lovense Software
a) When using a cam site
1. Connect the webcam to your Windows PC or Mac. Once connected, the blue light on the camera will flash. When it is fully powered, the blue light will be continuously illuminated.
2. Go to your broadcasting site and select Lovense Camera as your camera source.
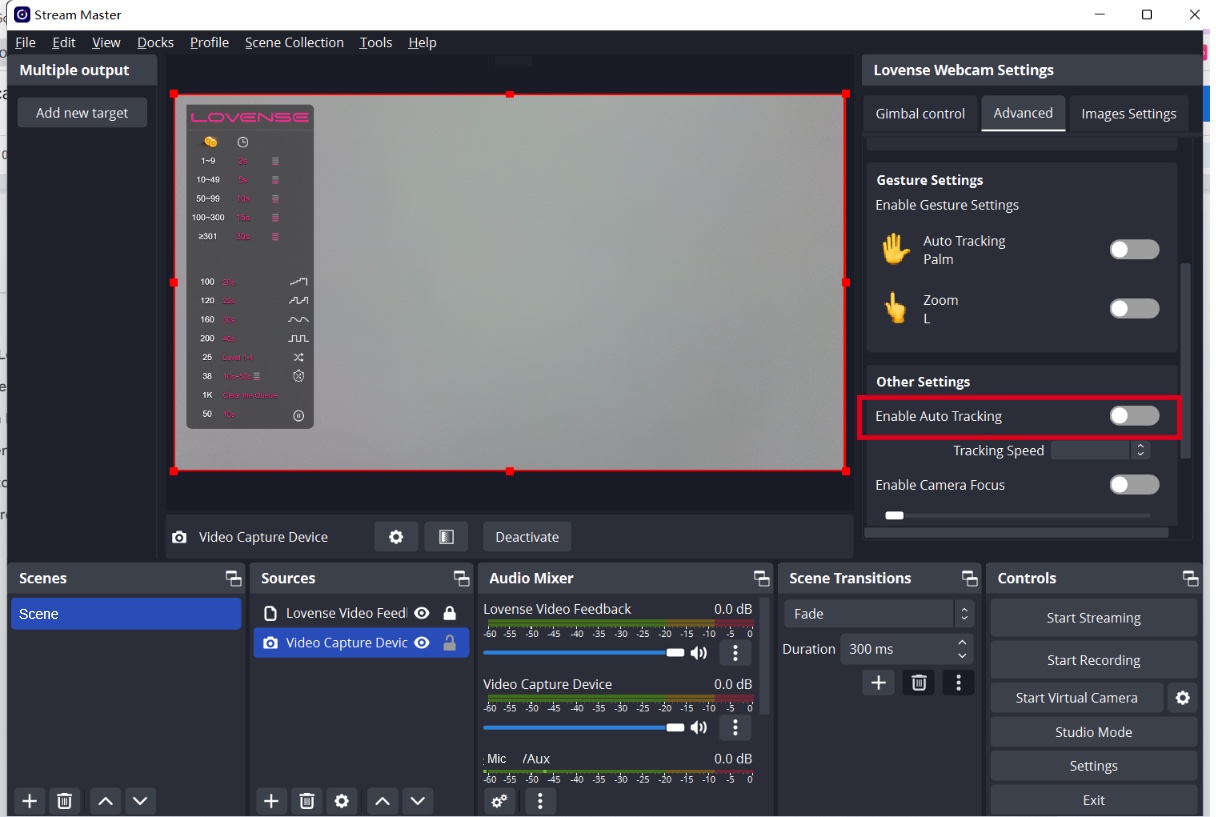
3. Enable Auto Tracking if needed.
To enable "Auto Tracking":
Show your face and palm to the camera.
When the webcam light flashes, the "Auto Tracking" feature is enabled.
To disable "Auto Tracking":
Show the palm gesture again to disable “Auto Tracking".
4. Zoom in and out - L gesture.
To zoom in:
- 1. Show L gesture and your face to the webcam.
- 2. Move your hand up and hold.
- 3. The light will flash and the camera will zoom in.
To zoom out:
- 4. Show L gesture and your face to the webcam.
- 5. Move your hand down and hold.
- 6. The light will flash and the camera will zoom out.
b) When using OBS
1. Connect the webcam to your Windows PC or Mac. Once connected, the blue light on the camera will flash. When it is fully powered, the blue light will be continuously illuminated.
2. Open the OBS.
3. Select Lovense Camera as the video capture device.
4. Enable Auto tracking if needed.
To enable "Auto Tracking":
Show your face and palm to the camera.
When the webcam light flashes, the "Auto Tracking" feature is enabled.
To disable "Auto Tracking":
Show the Palm Gesture again to disable “Auto Tracking".
5. Zoom in and out - L gesture.
To zoom in:
- 1. Show L gesture and your face to the webcam.
- 2. Move your hand up and hold.
- 3. The light will flash and the camera will zoom in.
To zoom out:
- 1. Show L gesture and your face to the webcam.
- 2. Move your hand down and hold.
- 3. The light will flash and the camera will zoom out.
With Lovense Software
a) For Lovense Cam Extension + OBS Users
Set up
- a) Connect the webcam to your Windows PC or Mac. Once connected, the blue light on the camera will flash. When it is fully powered, the blue light will be continuously illuminated.
- b) Install Lovense Cam Extension (30.7.0 or newer) to Chrome.
- c) Install OBS and Lovense OBS Toolset (2.0.8 or newer).
- d) Open built-in OBS and select Lovense Camera as the video capture device.
- e) Drag the "Lovense Video Feedback" source to the top.
Adjust your angles
Gimbal control
Control the view of camera
-
Drag the little circle in different directions (Up, Down, Left, Right)
Zoom in and out
-
Drag the bar to zoom in or out
Zoom in and out - L gesture
To zoom in:
- 1. Show L gesture and your face to the webcam.
- 2. Move your hand up and hold.
- 3. The light will flash and the camera will zoom in.
To zoom out:
- 1. Show L gesture and your face to the webcam.
- 2. Move your hand down and hold.
- 3. The light will flash and the camera will zoom out.
Set up tip-activated feature
Models can set up preset positions in OBS for different body parts and the tip amount and duration for each body part. Once tipped, the camera will zoom in on that body part.
Adjust the camera view.
Set a fixed camera view.
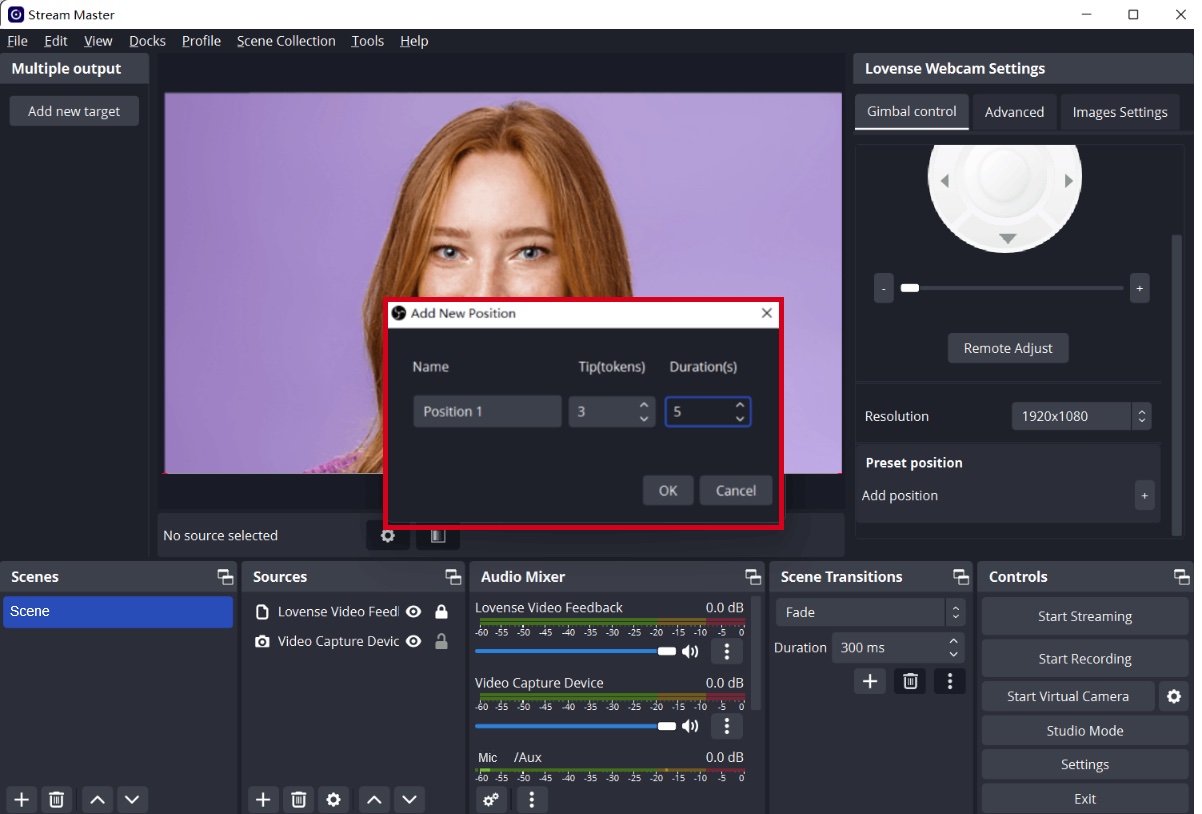
Add a new body part position you would like to be zoomed in on.
Set tip amount and duration for each body part being filmed.
Log into Lovense Cam Extension
Go to Lovense Cam Extension and:
a) Log in.
a) Enable Video Feedback Configuration.
Send a test tip
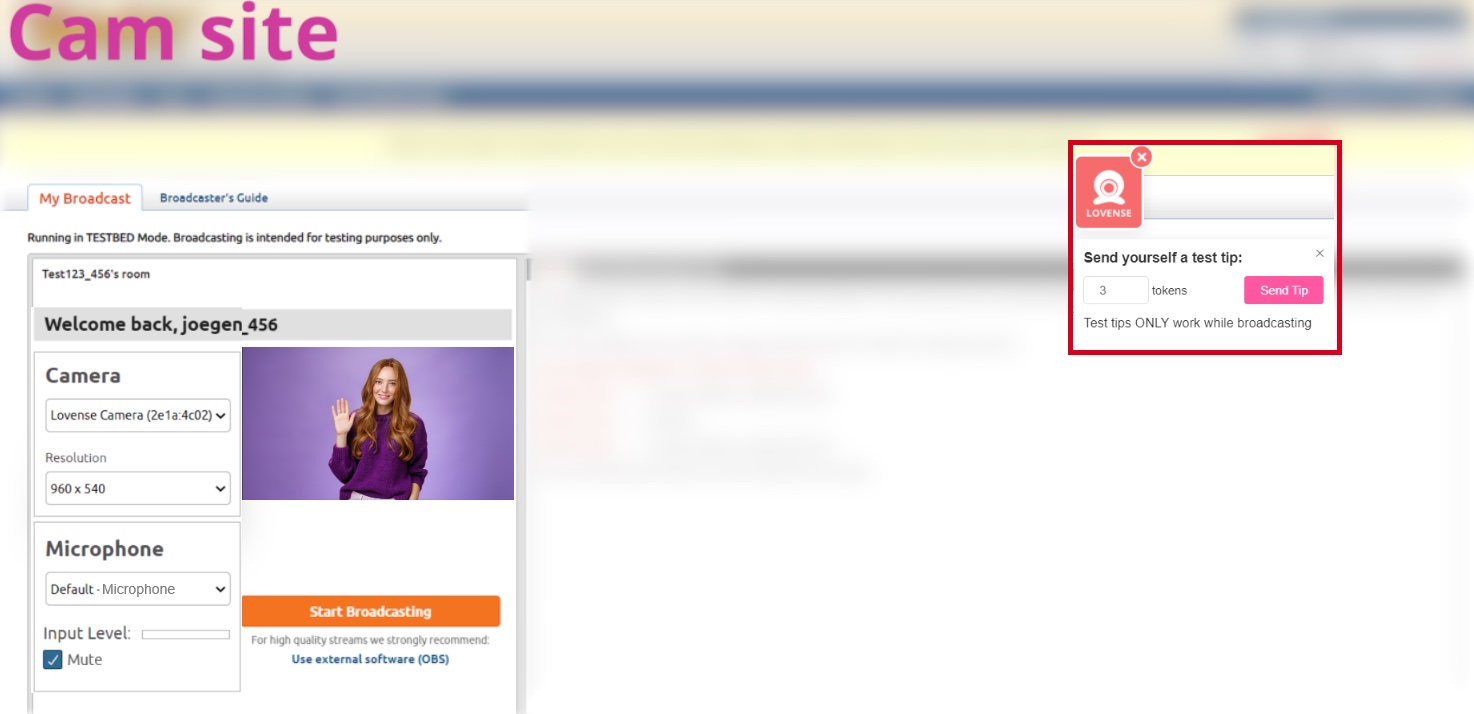
Go to the broadcasting page and send a test tip in Lovense Widget to test if the preset position works.
The Lovense Webcam will switch to the preset position.
The view will change to its original position after the test tip duration is over.
Enable Auto tracking if needed
Button control
Stand up, walk away from the camera, walk to the left and right.
Enable "Auto tracking" with gesture, disable "Auto tracking" with gesture.
Enable AI Zoom and make different poses
Your body will always stay in shot.
Whole body: Stand up and show your whole body in front of the camera.
Half-body: Sit on the chair and show your half body.
Head: Sit in front of the camera and make a cute expression.
Note: Whole body only works if there is enough distance between you and the camera.
You are now ready to go live!
You may want to use Gesture Control during the show
To enable "Auto Tracking":
Show your face and palm to the camera.
When the webcam light flashes, the "Auto Tracking" feature is enabled.
To disable "Auto Tracking":
Show the palm gesture again to disable “Auto Tracking".
Optional features
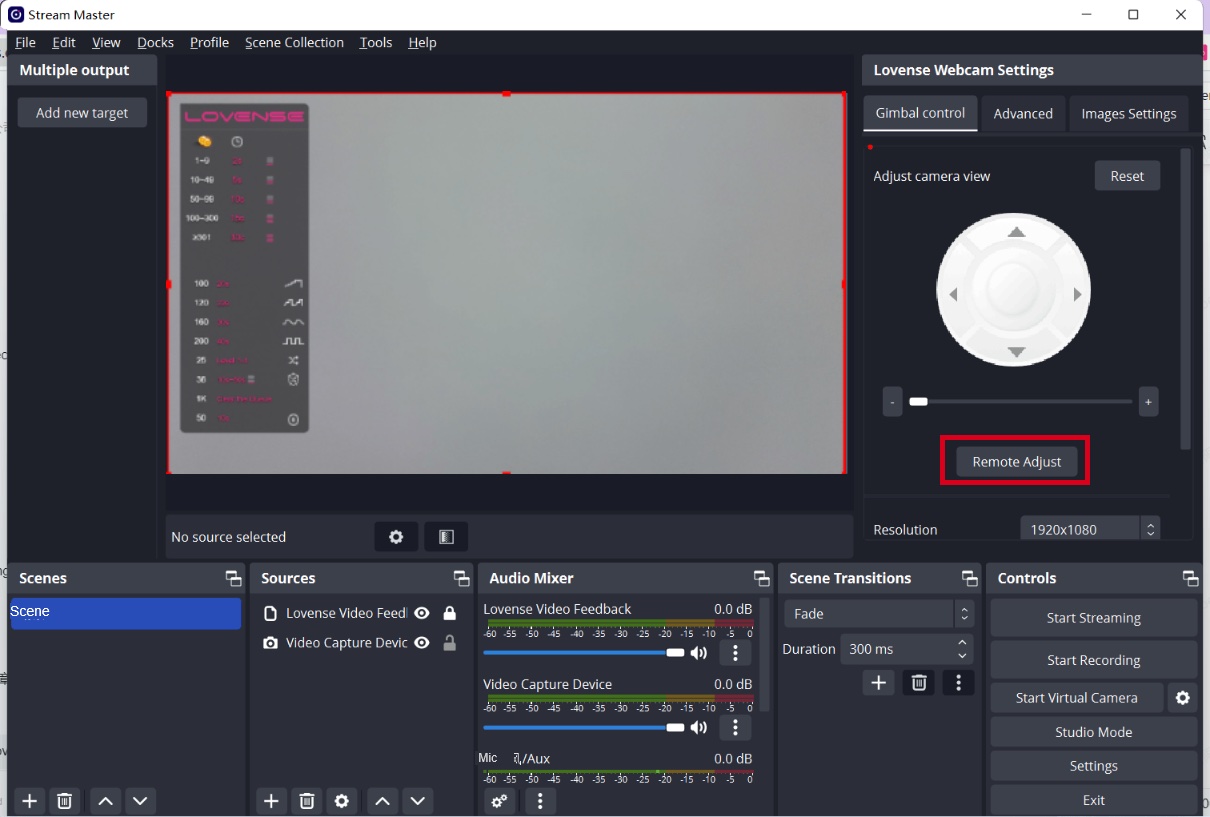
Remote adjust
If you move further away from your computer while broadcasting, you can control the Lovense Webcam using the "Remote Adjust" feature on your phone.
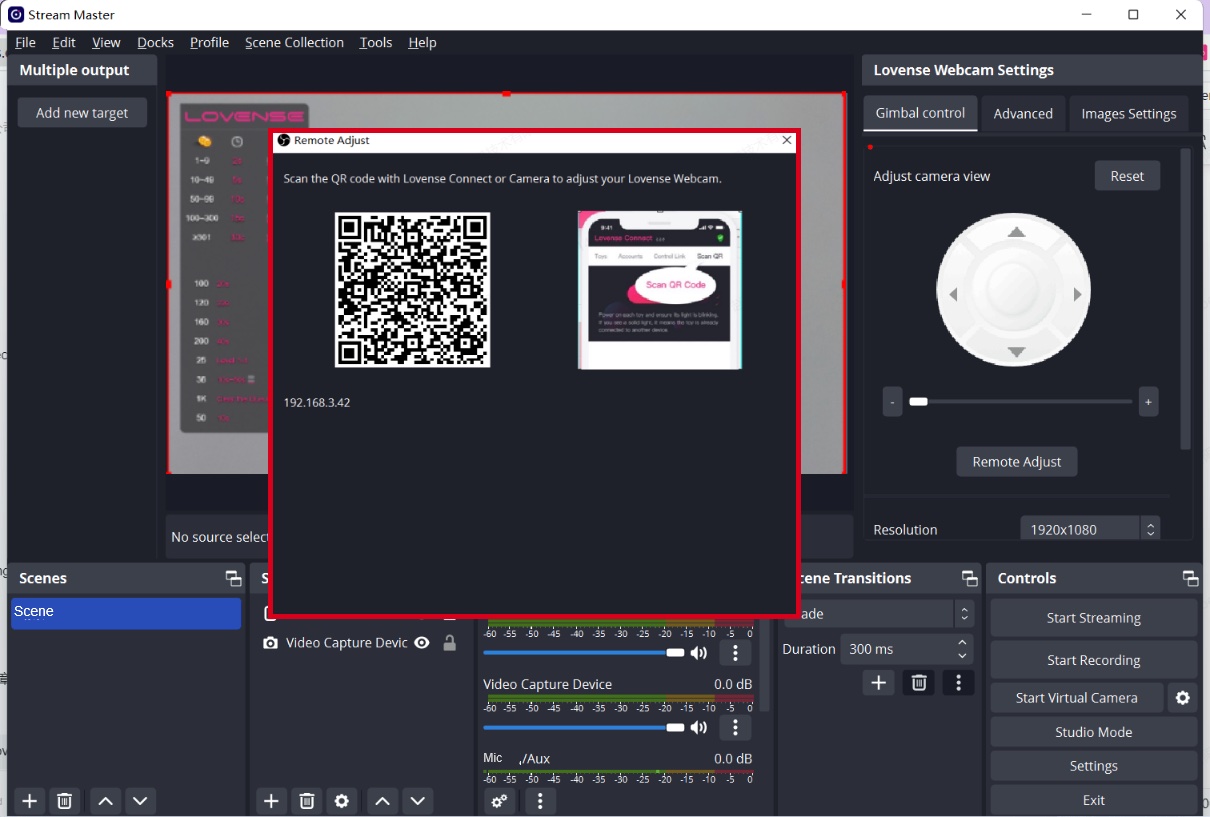
Open QR code of "Remote Adjust"
Scan the QR code with the Lovense Connect app (2.8.6 or newer for iOS and 3.0.2 or newer for Android) or Camera.
Please make sure your mobile and PC are on the same Wi-Fi network.
Open the remote adjust panel in the mobile browser.
Control the view of the camera (Up, Down, Left, Right).
Zoom in and out with the button.
Zoom in and out with gestures.
Show the changes in OBS.
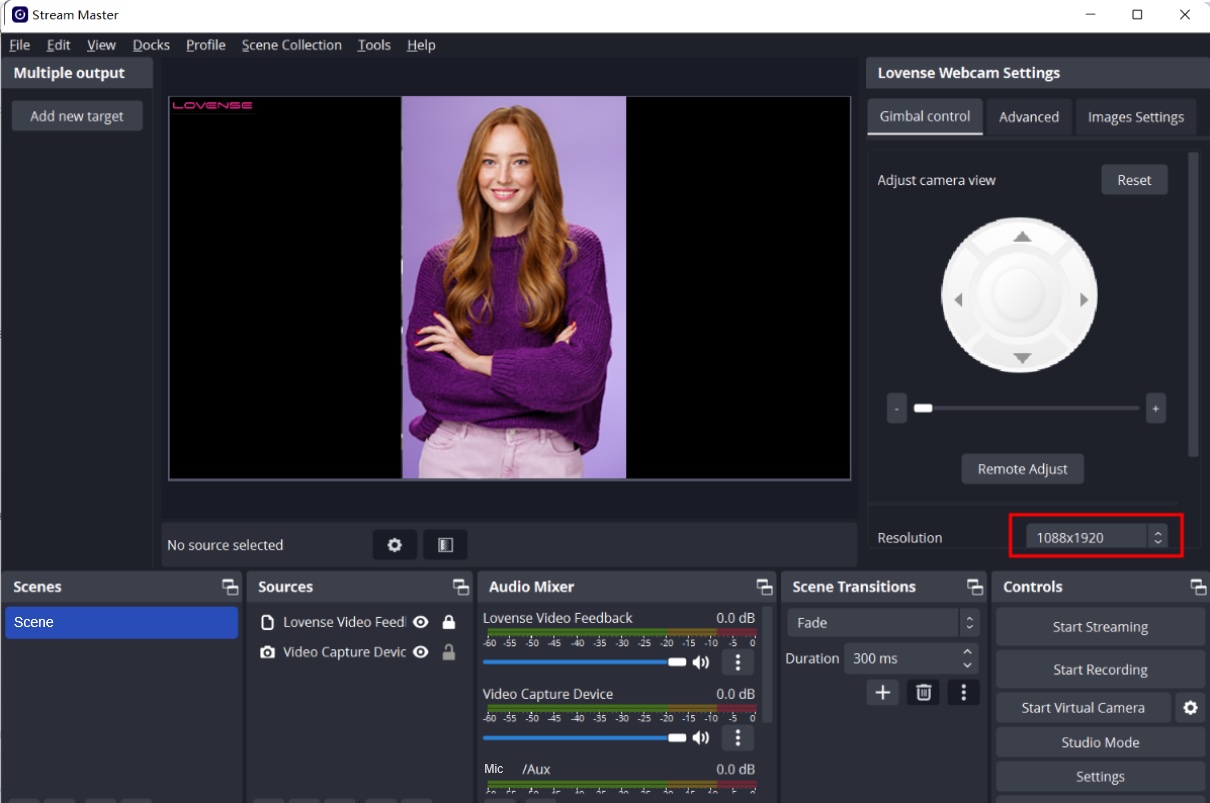
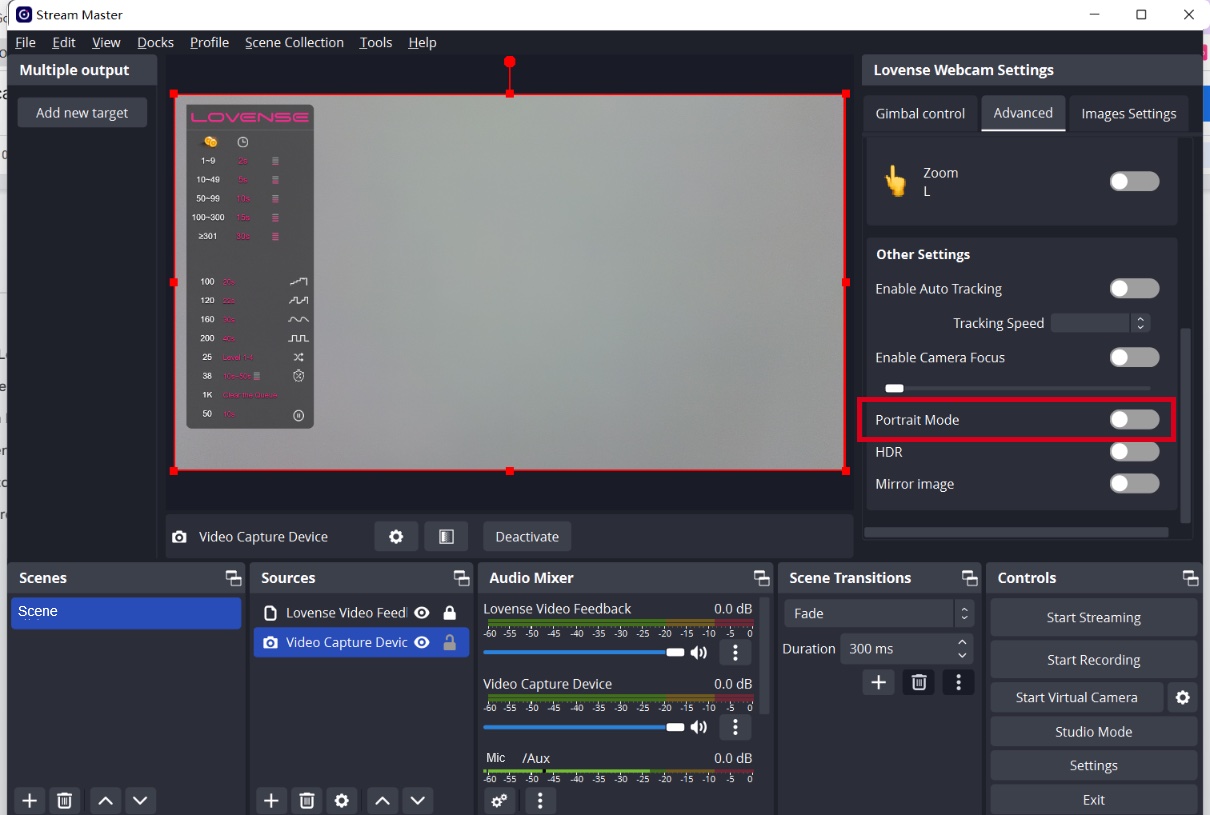
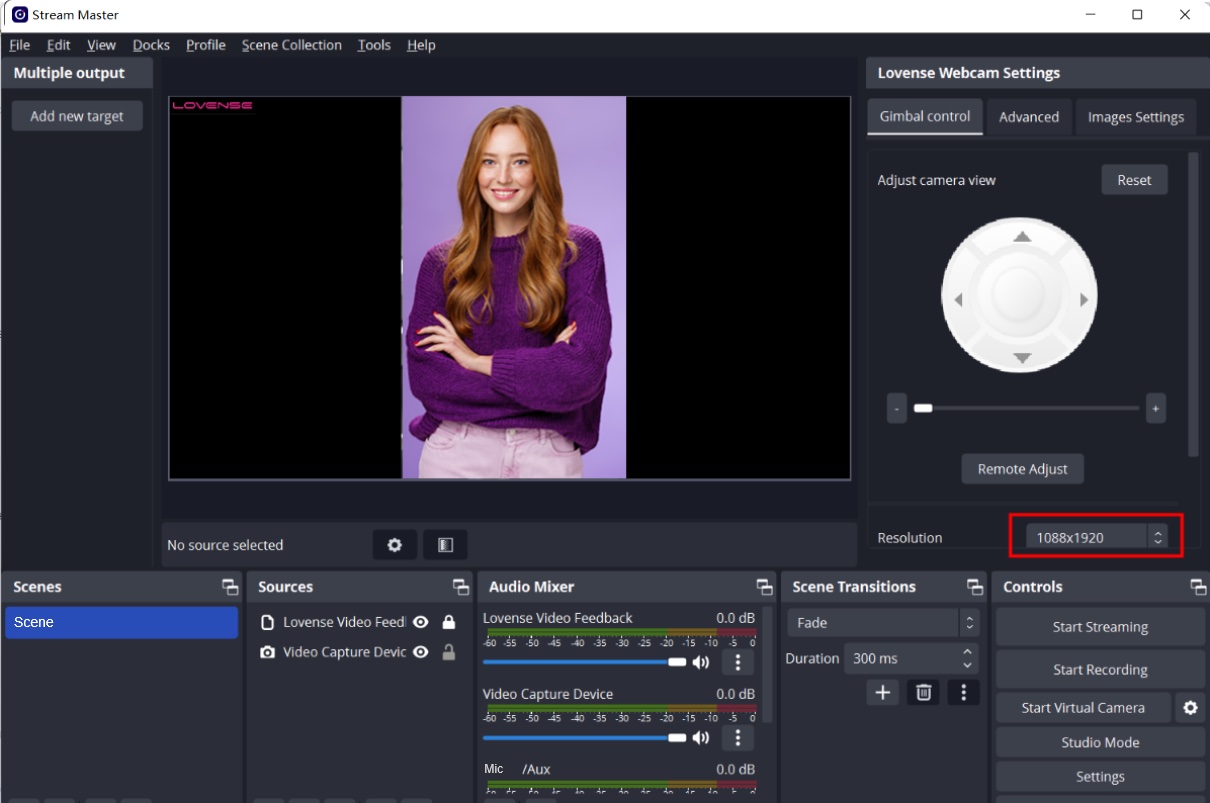
Enable Portrait Mode and show the change in OBS.
Enable Auto Tracking.
Move your body slightly in front of the camera.
Let the camera follow your movement.
Portrait mode
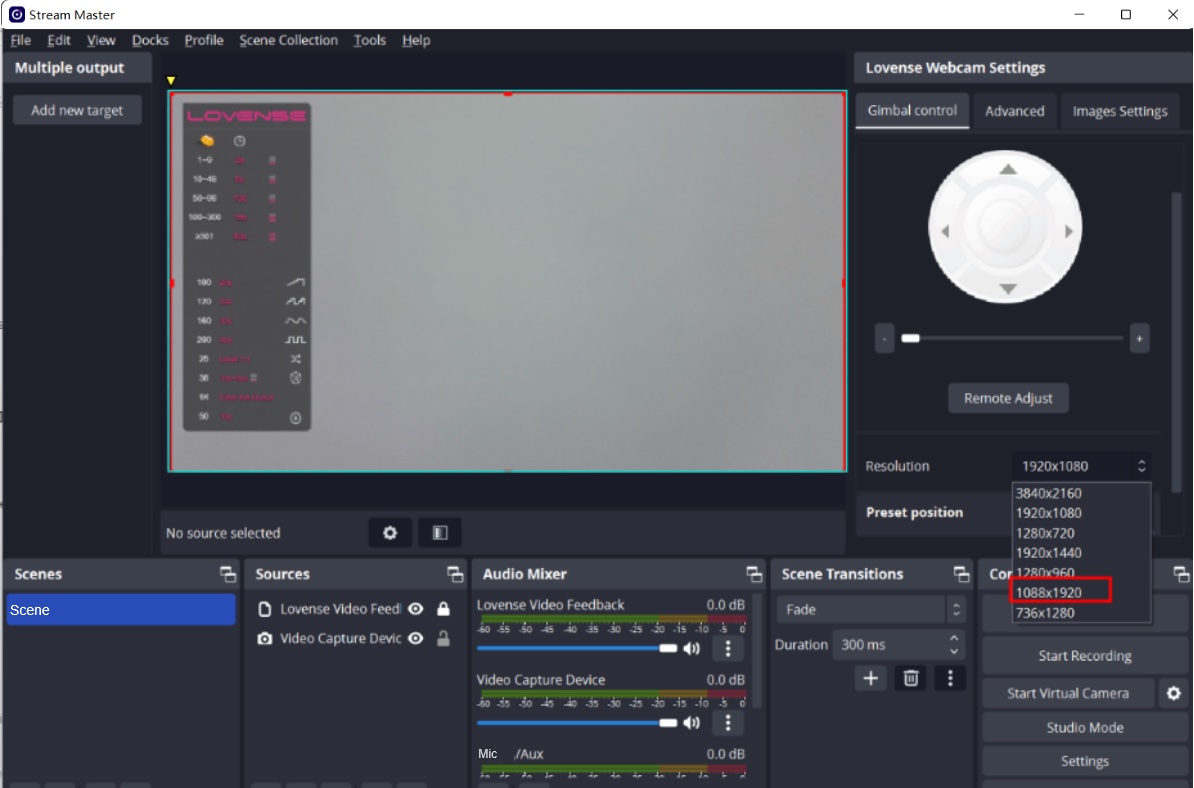
Enable "Portrait Mode".
Choose a portrait resolution.
b) For Stream Master users
Set up
- a) Connect the webcam to your Windows PC. Once connected, the blue light on the camera will flash. When it is fully powered, the blue light will be continuously illuminated.
- b) Install Stream Master (1.2.2 or newer).
- c) Open built-in OBS and select Lovense Camera as the video capture device.
- d) Drag "Lovense Video Feedback" source to the top.
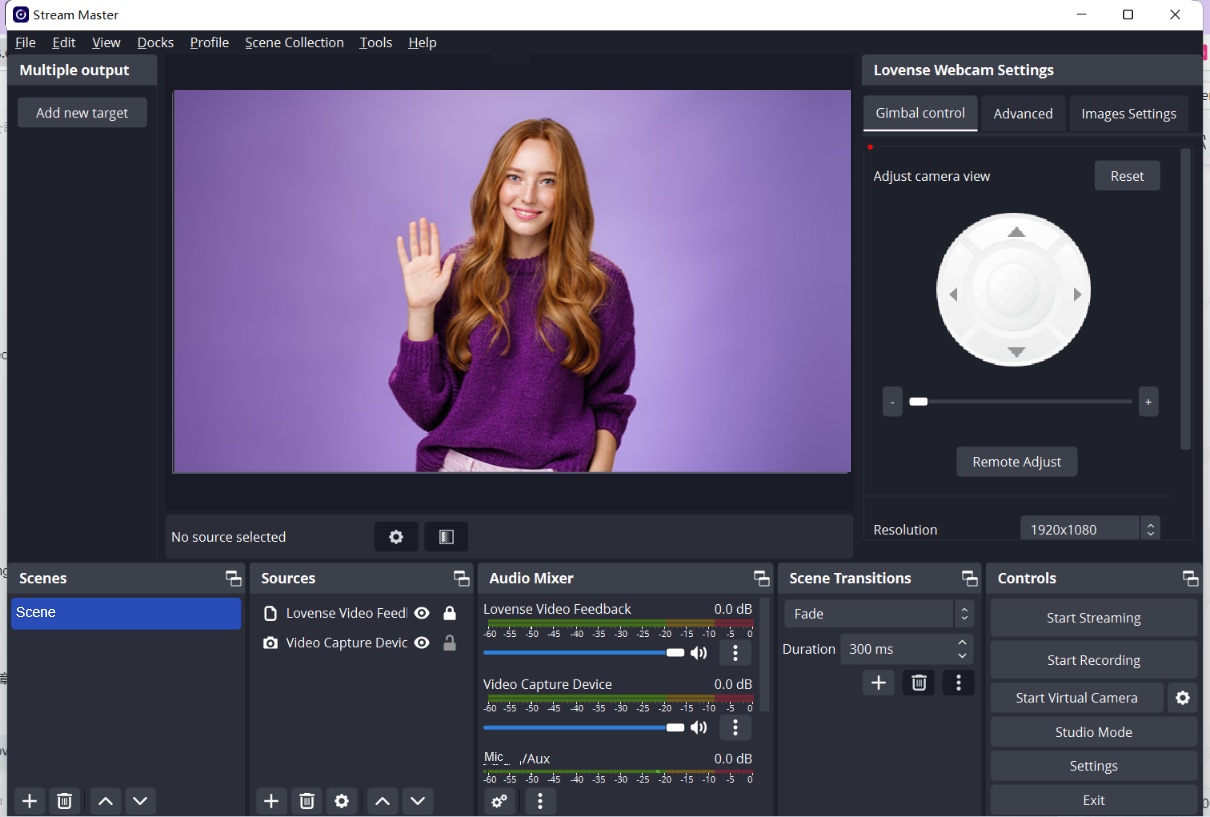
Adjust your angles
Gimbal control
Control the view of camera
-
You can easily set up a Lovense Webcam with or without Lovense software.
Zoom in and out
-
Connect the webcam to your Windows PC or Mac. Once connected, the blue light on the camera will flash. When it is fully powered, the blue light will be continuously illuminated.
Zoom in and out - L gesture
To zoom in:
- 1. Show L gesture and your face to the webcam.
- 2. Move your hand up and hold.
- 3. The light will flash and the camera will zoom in.
To zoom out:
- 1. Show L gesture and your face to the webcam.
- 2. Move your hand down and hold.
- 3. The light will flash and the camera will zoom out.
Set up tip-activated feature
Models can set up preset positions in OBS for different body parts and the tip amount and duration for each body part. Once tipped, the camera will zoom in on that body part.
Adjust the camera view.
Set a fixed camera view.
Add a new body part position you would like to be zoomed in on.
Set tip amount and duration for each body part being filmed.
Log into Stream Master
Go to the Stream Master’s settings page and log in
Send a test tip
Go to the broadcasting page and send a test tip in Lovense Widget to test if the preset position works.
The Lovense Webcam will switch to the preset position.
The view will change to its original position after the test tip duration is over.
Enable Auto tracking if needed
Button control
Stand up, walk away from the camera, walk to the left and right.
Enable "Auto tracking" with gesture, disable "Auto tracking" with gesture.
Enable AI Zoom and make different poses
Enable AI Zoom and make different poses
Your body will always stay in shot.
Whole body: Stand up and show your whole body in front of the camera.
Half-body: Sit on the chair and show your half body.
Head: Sit in front of the camera and make a cute expression.
Note: Whole body only works if there is enough distance between you and the camera.
You are now ready to go live!
You may want to use Gesture Control during the show
To enable "Auto Tracking":
Show your face and palm to the camera.
When the webcam light flashes, the "Auto Tracking" feature is enabled.
To disable "Auto Tracking":
Show the palm gesture again to disable “Auto Tracking".
Optional features
1. Remote adjust
If you move further away from your computer while broadcasting, you can control the Lovense Webcam using the "Remote Adjust" feature on your phone.
Open QR code of "Remote Adjust"
Scan the QR code with the Lovense Connect app (2.8.6 or newer for iOS and 3.0.2 or newer for Android) or Camera.
Please make sure your mobile and PC are on the same Wi-Fi network.
Open the remote adjust panel in the mobile browser.
Control the view of the camera (Up, Down, Left, Right).
Zoom in and out with the button.
Zoom in and out with gestures.
Show the changes in OBS.
Enable Portrait Mode and show the change in OBS.
Enable Auto Tracking.
Move your body slightly in front of the camera.
Let the camera follow your movement.
2. Portrait mode
Enable "Portrait Mode".
Choose a portrait resolution.
